Monday 4 June 2012

Candid snapshots from class.

This is just a simple collection of my fellow classmates as we go about our duties during our Wednesday night class. No real point to this post other than to share a few photos.


D.


Wednesday 30 May 2012

Great Success !! I like it, it's nice.

I had a very productive day today.


Managed to process all three proof sheets from the rolls of film i shot through for the final assessment task for this elective class - "my life".


All frames have decent images in them that also appear well exposed and interesting when looked at closer with the loupe magnifier.


After completing the proof sheets i then proceeded to select the required 5 stand out images ready to be enlarged and refined in the darkroom. I managed to do just that to two of my images, which leaves only three more to do before i am then ready to add them to my visual diary, add support information and a written report ready for submission.


Pretty stoked about this.


D.


Saturday 26 May 2012

boo-yah !

As a follow-up to my previous post, i am pleased to report that i shot through 2 rolls of black and white film and on Wednesday (before State of Origin started) i successfully developed both of them perfectly in class and managed a test proof-sheet of one roll. 


To top it off i got 37 exposures out of both rolls - good old Pentax shines again :]


So next week i endeavour to process a correctly exposed proof-sheet from both rolls of film and then select the 5 standout shots to then process and enlarge ready to submit in my visual diary so i can put a big fat tick beside this elective as being completed. Exciting.


I do hope to do more with this subject as i find it wonderful and would like to improve my skills and knowledge of the whole process further so that once i finally do acquire a sexy medium format film camera i can really get the most out of it.


Stay tuned for photos.


D.

Monday 14 May 2012

My Plan..

As a continuation of the "My Life" assignment, i plan to take my film camera with me on the road tomorrow afternoon and photograph a number of things whilst away.


1. First will be random photographs of my journey (drive) to Sydney.


2. The next thing will be to take a bunch of photographs of my cousin's new baby boy for the very first time, his young daughter, his wife, himself and his two dogs - all of which are great company.


3. In addition to this i plan to photograph my day in Sydney as my fellow first years and i visit a number of gallery exhibitions as part of the HeadOn Photo Festival going on at the moment - should be cool.


4. Unbelievably, my parents fly back from New Zealand, to Sydney on Thursday for 1 night, before heading home via Brisbane on Friday - what are the odds of that for good timing ay. So i'm gonna stick around an extra day and pay them a surprise visit :]


5. The to cap it off i will shoot through any remaining film during my journey back to Canberra, might even take the long way home - see how i go.


So all in all, i am really looking forward to this little trip away, because not only will i get another chunk of a major assignment done, but am able to enjoy doing it around family that i haven't seen for some time now.


PUMPED BIG TIME !


D.

Wednesday 9 May 2012

My life - roll #1

Finally got to finish a roll of film today.


I managed to escape out to Uriarra Crossing mid-morning to continue photographing my rural theme of nature, and any country-folk and/or their way of life i could come across. Mainly because being out away from cement and steel helps me refresh and relax - parts of it also remind me of home.


Anyway, thought i had completely stuffed my film during the development process due to me removing the funnel part after opening the lid (for some reason) as i went to pour out the D76 developing liquid... thankfully it somehow didn't affect the film because i inspected the negatives with my magnifying glass and they all look good as gold!


See if this is actually true once i start to process the negatives into prints i guess.


From here i will see if i can have the roll of film that was taken from me by security at Brindabella Estate on Anzac Day returned so i can wind the film back into the canister, re-load it into my film camera and then shoot through what wasn't exposed - that is if they didn't pull it all out of the canister. If this isn't doable i will start shooting another roll over the next week and a bit. It might even be worthwhile taking it with me on the trip to Sydney.


D.


One of my negatives captured on
my iPhone looking a magnifier.
 

Funky look'n glasses you got there Dru.

Friday 30 March 2012

Making a negative, positive.

21/3/2012 and 28/3/2012
(week 5 and 6)


This class was great!


It has been well worth the wait, i finally got the opportunity to develop the roll of film i shot for this class and then process the negatives as a proof-sheet in the dark room.


I am really quite pleased with how my photographs have turned out on the proof sheet. The old PENTAX has performed well.


Turning a NEGATIVE into a POSITIVE
The process takes place in the dark-room and basically involves you positioning the negatives over a piece of light-sensitive paper and exposing it all to light. The negative image acts as a shield over the areas of the light-sensitive paper you DON'T want exposed to light - hence the the terms negative and positive image.


You must first select one or two slices of film, set them up onto of half a piece of light-sensitive paper and process a test-strip. The six images on each slice of paper allows you to give six exposures of 5 second intervals each to the entire test strip. The purpose of this is to get an idea of what sort of time you should then expose the following proof-sheet for. The key things to look for that indicate a correct exposure time is clean, crisp, white lettering just off the negative image and the film's edge near the sprocket holes should be ever so close to being unnoticeable.


36 film negatives in plastic sleeve.


Test-strip of positive images.

Indicator marks and shot number help to judge clarity.


36 positive images as a proof-sheet.


Once the correct exposure time has been established, it is then time to select an image of interest and prepare it for enlarging :)


Enlarging
This is basically the same process. You are still turning a negative image into a positive image, but at the light-source itself rather than at paper-level. The following image gives a visual representation of this.


A simplified image of an enlarger and its elements
required to produce a positive enlargment.

The negative is placed inside the enlarger
instead of being placed onto of the light-
sensitive paper like the previous step.


Contrast
Once the image was enlarged, it must then be decided whether or not in needs additional, or reduced contrast throughout the image to give it more punch! Here is an image i processed in class two weeks ago which displays the difference made to the same image by adding or reducing contrast in GRADE increments.

Grade increments are usually adding warmth to a black and white - you can do this yourself whilst shooting film if needed by simply placing yellow or red filters of varying intensity over the lens, if not, it can be done in the darkroom.


A test-strip and varying levels of contrast.


Grade 0 was simply too dull and lacked contrast.

Grade 1 produced a slight drop in contrast - tonally.

Grade 2 produced a winning combination of contrast.

Grade 3 was almost on the mark, but a bit light.

Grade 4 produced a dramatic result.

Grade 5 produced an even more dramatic result.
test-strip

28 second exposure - Grade 2.

28 second exposure - Grade 3.
Helped to richen the black areas.

16 second exposure - Grade 2. Strong contrast in
the clouds and left strong silhouettes.

13 second exposure - Grade 2. Reduced contrast in
the clouds and seperated the hills tonally.


D.


Wednesday 7 March 2012

Creating a proof-sheet

(week 4)


Another informative class. I think everyone enjoyed it tonight.


It involved us using the enlarger to expose our film sensitive photographic paper to light in conduction with the negative film we developed last week. Seeing the was fantastic for me, because i had read about the process a few years back, but tonight i was able to see it happen right there in front of me - and let me tell you it all made sense to me very quickly this time round. Seeing and doing is still the way i prefer to learn.


Anyway..


Fundamentals of an enlarger.
GET TO KNOW YOUR EQUIPMENT - you will be working in a near-dark environment, so it is important to familiarise yourself with the enlargers individual parts so that you can work safely and correctly with the lights off.


NB - The setting plate (cross-section pictured below) ensures precise contact of the negative and photographic paper so there is no gap between the two where light leakage could occur.

cross-section of the setting plate


film negatives

light-sensitive paper


Important things to remember.
Always start at GRADE 2 on the enlarger - then adjust to 2stops down (e.g. 2.8 --> 5.6).


Ensure your light source covers the setting plate you will place your photographic paper and negatives on - then focus the light so that it has crisp edges (not furry edges).


Avoid over-tightening dials and knobs - just has to be firm.


Each enlarger has its own lens cap - so don't lose it.


Keep your photographic paper in its packaging to avoid exposing it accidentally.


Avoid putting your hands all over your negatives and photographic paper - stick to outer edges.


All enlargers require power in order to operate the electronic time settings.


The hight of some enlargers are adjusted manually and some are adjusted electronically.


The control box beside the enlarger works the settings so it to has to be turned on.


Some of the enlargers lens' adjust 1 full stop at a time, others adjust only half a stop - so always check this as you are operating.


When developing your photographic paper, avoid contaminating the chemicals - use separate tongs for each step of the process and avoid letting them enter the next liquid by gently dropping the photographic paper into the chemical instead of dunking it in with the tongs. 


Finally it is important to have with you (to use) a piece of thick card to use as a screen over your film negatives - reason is explained below.


Chemical measurements.
Developera volume of 1L at a ratio of 1:9 (100ml chemical : 900ml water).
Stop Batha volume of roughly 1L ( just over 1cm high in the container).
Fixera volume of roughly 1L ( just over 1cm high in the container).
Wash - a large volume in a container that has a gentle flow of fresh water passing through it.


No Hypo Cleaner or Foto-Flo used in this process.


The proof sheet.
The process of making a proof sheet from your negatives requires you to first set up the enlarger and get everything positioned and ready to go before you set your photographic paper and negatives. We also sliced the photografic paper in half (or thirds) to make it easier to work with as beginners - i think that was the reason.


Ensure the enlarger is dialled in to the correct setting according to the chart that is up on the walls of the darkroom. Each model of enlarger has its own chart detailing how and where to have the magenta and yellow set to (usually 0, but still check).

Then once everything is in place ready to go, cover all except the first (of six) negatives with your thick piece of card. Now you are ready to expose the paper to light from the enlarger for a set time (measured in increments of seconds). The areas that the developed film negative doesn't cover will be exposed to light and the areas that don't will remain white - simple huh!

Once the first negative has been exposed for 5 seconds, slide the piece of thick card back to reveal the next slide. You are now ready to expose that for 5 seconds and so on and so on. The thing to note here is that you only continue to reveal negatives, you don't cover up the ones you expose - so if there are 6 negatives in a row and you do 6 exposures the first negative is going to end up being exposed 6 times compared to only once for the last negative - why do this? This is done to help you determine the correct amount of time to expose your negative to light for to obtain the best result according to the amount of time. In other words the proof sheet is a way to determine which of the six exposure times is best to use - is it the first one @ 30seconds the fourth one @ 15seconds or the last exposure @ 5seconds?

You can tell which is the best result from the crispness/sharpness/clarity of the numbers/letters that run along underneath the actual pictures.


It was so cool to watch this process for real tonight for the very first time, i'm so pleased to be doing this elective subject as i think it will help deepen my appreciation for the art of photography and install my utmost respect for the people who mastered it all and brought this to be such an amazing thing to do.


D.


Saturday 3 March 2012

Developing film

Developing film.
(week 3)


Something happened on Wednesday night, February 29 that i have waited a long time to achieve - i developed my very first roll of film. 

The culprit was a roll of 24 exposure 35mm, Kodak (RIP) T-MAX ISO 400 that i purchased probably 11 years ago. It was exposed late last year whilst living in Brisbane, on the OLYMPUS-TRIP camera my father handed down to me two Christmas's ago.


It is a classic retro design, so simple & quiet to use on the street as well as so light to carry around. Love it :)


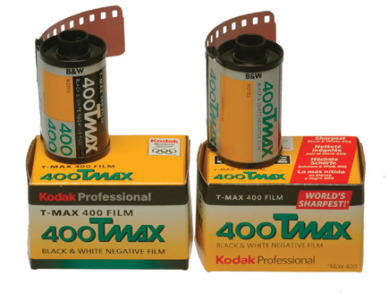
The Kodak 400 TMAX black & white film i used.

Olympus Trip 35 film camera.

me trippin' at my place in Brisbane one evening during the 2011flood.
The little  thing can operate my 430XE speed light and Elinchrom
lighting kit thanks to the hot-shoe and sync cord outlets - awesome!

Anyway.. 

I was one of the fortunate people in class able to develope their roll of film before time ran out, this was fortunate, but a real shame for those who missed out, because i could see genuine excitement and enthusiasm amongst my fellow class mates as they patiently waited their turn. Alas, next week they will have their chance :)

So after being shown the ropes in class of how to first extract the leading end of the film from its canister (way cool) and then how it is loaded onto the spool which then goes into the light-tight container ready for the actual chemical process - it was up to us to take a few minutes of hands-on practice before doing it for real..  an anxious moment for most i suspect.


Equipment required to develop a roll of photographic film:   - Film extractor tool - Scissors - Clock - Rubber gloves - Rubber apron - Protective eye wear - Thermometer - Light tight container (5 parts to this) - Measuring containers (or large test tubes) and somewhere to hang your film while it dries.


Liquids required to develop a roll of photographic film: D76 developer - Stop Bath - Fixer - Hypo Cleaner - Photo-Flo and clean running water.


Some of the equipment needed to develop a roll of photographic film.

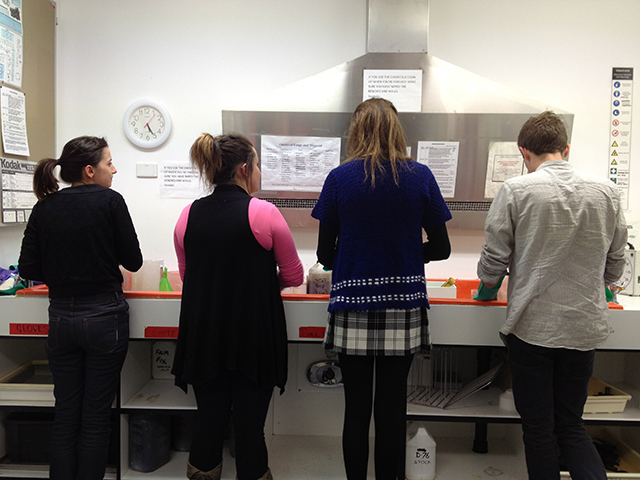
CIT's wet darkroom where negatives are enlarged and processed on
light-sensitive photographic paper to create usable prints.

_


As i was loading my film onto the spool in the dark-room, i must admit i wasn't 100% sure it had fed smoothly and was all correct, but i was the last to finish and the spool was now in its light-tight container, Kiki and Heidi were sounding keen to return the the comforts of a room with some light too so i just had to remain positive.

So after a 12 minute development process consisting of rotational inverting and agitation of the D76 chemical within the light-tight container, it was time to dispel the liquid and move on to the Stop Bath solution. This involved the same agitating actions but for only 3 minutes before it was poorer out and the Fixer was added to again go through the same agitation process - i found this process quite enjoyable and remained fully focussed on the task at hand.


After these three processes it was time to begin the washing process. So for a little over 2 minutes, water was flushed through the container. Next step was to add the Hypo Cleaning Agent and return to the rotation and inversion technique before returning to flushing water back through the container for 5 minutes.


The final step involving any liquids, was to then disassemble the developing container and gently submerge the spool of film into a container of Photo-Flo - an agent that allows water to run off the film whilst drying without leaving streaks of residue. The spool spent 30 seconds - 1 minute in this solution. I then removed it and began to unroll the film from the spool. This is when my efforts were rewarded, because i could now see the results of the magic that is photography (drawing with light). An exciting moment for me :)


Now all that was required was to run my fingers down the length of the film like a squeegee to remove as much of the remaining liquid as possible before then transferring it to the drying machine where it is hung vertically for a few minutes.


As the film was drying i took time to ensure everything i had used was rinsed with water and returned to it's spot ready for the next person to use.


Job done!


*
Big thanks to Lindi Heap for continuing to deliver all the information with a bit of good old fashioned enthusiasm for her students. I am enjoying her classes.


_


The result !
Here is a photograph taken on my iPhone of the film negatives i came away with from Wednesday night's class. Next step is to process the negatives so that they appear as a positive image which can then be viewed and understood in the way we know and trust i guess you could say.. bring it on :)


_


Still to develop..
In addition to the roll of film and camera mentioned above, i shot through another roll of film on another camera - my original SLR from 13 years ago.

The camera is a PENTAX MZ-50 electronic body. I used a variety of SIGMA lenses that i have acquired over the years - two of which are made for a digital camera body, but work perfectly on this film body, awesome!! The roll of film was, Illford HP5 ISO 400 black & white.

The lens collection i used to help capture a variety of interesting images were - SIGMA 18-55mm f/3.5-5.6DC, 55-200mm f/4-5.6DC and 28-80mm f/3.5 with macro non digital, as seen in the below image.


My PENTAX MZ-50 and collection of SIGMA lenses.

The film i used - Illford HP5 PLUS 400 black & white.

I expect a far broader range of interest from the photographs on this roll of film and can't wait to see the results this combination of camera and film produce.


D.


Wednesday 29 February 2012

General thoughts

Wet Darkroom Techniques:
(week 2)


I really look forward to this elective subject and hope to take away from it:
- a renewed level of appreciation for "how it used to be done".
- a solid set of developing and enlarging skills.
- an abundance of new information.
- a creative collection of images.
and all with minimal mistakes.


I reckon film photography is beautiful, magical and pure. 


It helps you think more and shoot less which i totally respect and feel this may help me in a digital sense too long term. I also totally get the "romance" of using something simple and mechanical - it's kind of like the feeling of driving an old classic muscle-car.


I have also dreamed of owning a beautiful Hassleblad medium format camera for some time now, so i'm sure that the skills i acquire in this class will only help encourage me to follow up on that dream, boost the old bank balance and acquire one.


D.


one day..